
Have you ever thought of writing Urdu in your native word processor? Obviously! Who wouldn't love to write Urdu in his/her own native Microsoft Office Applications... Well, now you can! Many solutions have been provided by different websites all over the web, but none comes to the standards. A sample image of how Urdu written in Microsoft Word 2010 looks:
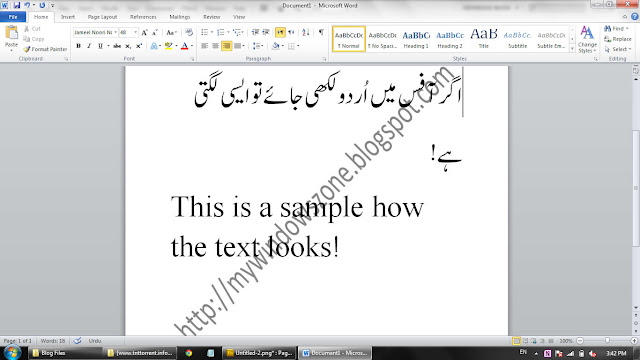

Likewise, Urdu can also be written in other applications such as Power Point, Excel and even Access. Yes, it is now very easy to have urdu based spreadsheets, and even presentations in Urdu. But in most of the solutions given on the net, the style of Urdu language, like that shown in the screen shot above is absent, and the standard Arabic style is adopted for writing Urdu. Well that's not cool! But after reading this post, you will be able to write Urdu as shown above in your Microsoft Word, Excel, and any other Microsoft Application! You will even be able to send and receive Urdu Emails, and read the urdu news paper at the NawaiWaqt website! This technique will work in any version of Microsoft Office, be it 2010, 2007, 2003, or even 2000!
Step 1: Install Urdu Fonts on your Computer
This step will basically help you to read Urdu, wherever it may be, as mentioned above also. Hit the download button below to download the .exe file. Once finished, install it on your computer like any other application, and the first step is done!
Step 2: Install Urdu Keyboard on your Computer
Now most of you would think, "How can a new keyboard be installed? Would it replace our present one?". Actually, it is not the hardware one, it is the software one. Whenever you type on your computer keyboard, the keyboard software in the computer identifies the letter of each keystroke, and presents it on the screen. Similarly, the urdu keyboard will allow the computer to present an urdu character for each specific keystroke on your hardware keyboard e.g. if you press 'A' on the keyboard, on the screen, it will write 'ا' (Alif).
The explanation might be tough to understand, but the keyboard is pretty easy to install. Its a simple software, which you will install directly on your computer. To download the software, hit the relevant button just below:
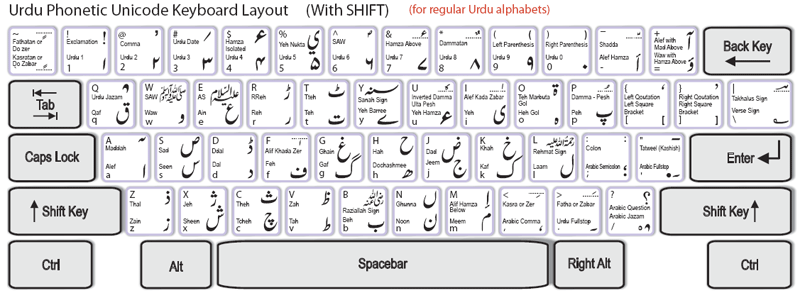
It is to be kept in mind that the keyboard given is the phonetic one, with the layout given below:
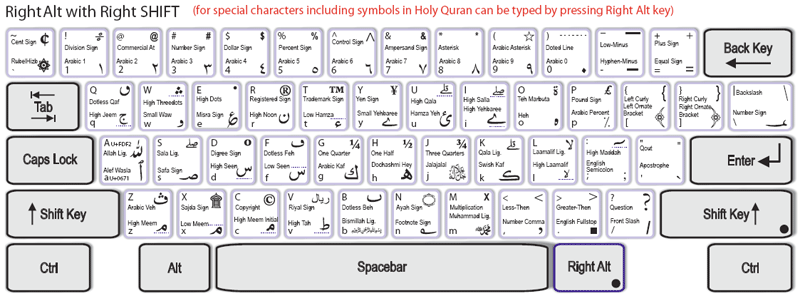
Another schematic of the keyboard with another combination of keys mentioned on it is given below:
If you want to download a PDF copy of it, you can simply do it by clicking here.
Note: For windows 7 and Windows Vista fellas, the job is done here. They might see the EN or UR icon near the notification bar, and can click it to toggle between keyboards. The same can also be done by pressing Alt+Shift. Also to note that you will have to choose the urdu keyboard everytime you are to write urdu in any application. Windows XP fellas, you will have to follow the instructions given here, after performing the first and the second step. Once done, users of any type of windows will have to follow the third step!
Step 3: Installing the Jameel Noori Nastaleeq Font
After performing the first two steps, you will be able to read and write urdu on your computer. But the writing wont be the original nastaleeq i.e. the urdu would look much like written Arabic. To give it the layout as given in the screen shot above, you will have to install the simple font, which you can download by pressing the button below. It would be a standard style. Double-click it, and it will open a window as shown below:

After installing this font, if you want the layout of Urdu as given in the very first sample screenshot, you will have to select the "Jameel Noori Nastaleeq" font from the dropdown list in the MS Office before writing urdu, after selecting the UR (Urdu) keyboard!
And that is it! You are all done! Now you can enjoy writing urdu wherever you want, whenever you want, without the need of any external agency e.g. InPage. And yes, this method has no viruses at ALL! This post was written with help from the website "urdu.ca", but the step 3 was my own discovery. But you have it all! So enjoy!
No comments:
Post a Comment
Enter your comment here. You can only comment if you are a member of this blog!
Note: only a member of this blog may post a comment.